Why This Levada Punishes the Unprepared
Every list of Madeira’s best walks puts the Levada do Caldeirão Verde near the top, and every one of those lists undersells it in the same way: by leading with the word “flat”. The levada itself barely climbs — that’s the entire point of an irrigation channel, which has to fall gently and evenly from the wet north to keep moving water downhill without pooling or overflowing.
What those lists leave out is that flat and easy are not the same thing when the path narrows to a metre-wide ledge above a drop, when the surface is slick with spray, and when four tunnels swallow the trail into total darkness for a combined stretch of well over half a kilometre. This is the walk that catches out fit, sensible people who assumed a levada with no hills would be an easy one.
It is also, done properly, one of the best days out in the central mountains: a forest walk that changes character every twenty minutes, a genuine sense of remoteness once you’re past the car park crowds, and a waterfall and pool at the far end that reward the effort of getting there. This page covers that route specifically — the trail from Queimadas to the Caldeirão Verde. It shares its basic idea with Madeira’s other famous levada walk, the Levada das 25 Fontes at Rabaçal, but the two are different enough in length, difficulty and character that they deserve separate treatment — more on that comparison below.
Getting to the Queimadas Trailhead
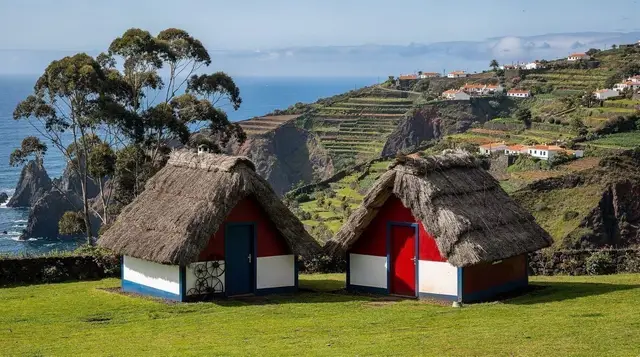
The walk starts at the Queimadas Forest Park, a small car park and picnic area with a cluster of thatched-roof buildings, a short drive above Santana on Madeira’s north coast. From Funchal, allow 45 to 55 minutes by car, most of it on the fast VE5 dual carriageway before the road narrows and climbs into farmland and then laurel forest. The car park is small and fills early on clear weekends — arriving before 9am gives you the best chance of a space and the best light in the forest.
There’s no public transport that puts you at the trailhead conveniently for an early start, which is one reason many visitors book a guided option instead of self-driving. If you’d rather not manage the rental car, the parking and the round trip logistics yourself, a full-day guided hike from Ribeiro Frio through the mountain interior covers similar terrain with transport and a local guide included, which also solves the permit booking for you.
The Route, Kilometre by Kilometre
The path leaves Queimadas through managed forest — eucalyptus and pine giving way within the first kilometre to the older, denser Laurissilva that defines this side of the island. The levada itself sits just below the path for most of the way, a narrow concrete or stone-lined channel with a steady trickle of water heading downhill towards the farms of the north coast, part of a network that has moved water this way since the fifteenth century.
| Stage | Approximate distance | What to expect |
|---|---|---|
| Queimadas car park to first tunnel | ~1.5km | Wide, well-shaded path; the gentlest section |
| Tunnels one to three | ~1km combined | Unlit, damp, uneven underfoot; head torch on |
| Tunnel four | ~200m+ | The longest single tunnel on the route |
| Final approach to the pool | ~1.7km | Opens into denser forest, narrower ledge sections |
| Caldeirão Verde — pool and waterfall | — | Turnaround point; picnic spot before the return |
| Return to Queimadas | ~6.5km | Same route, retraced |
Add it up and you’re at roughly 13km for the round trip, almost all of it at the same gentle downhill-then-uphill gradient a levada demands. On paper that sounds like an easy half-day. In practice, the tunnels, the concentration required on the exposed sections, and the sheer distance push most walkers to five, six, occasionally seven hours including stops — longer than a 13km flat walk anywhere else on the island would take.
The Four Tunnels: What to Actually Expect
This is the detail that separates people who’ve done the walk from people who’ve only read about it. The tunnels aren’t atmospheric lighting-optional features — they are stretches of solid rock with no ambient light at all, floors that are wet, sometimes gravelly, sometimes slick, and a ceiling low enough in places to require ducking. The longest runs over 200 metres; walking it without a proper light means feeling your way along a wet wall in the dark, with the levada itself running immediately alongside the path.
A phone torch works for perhaps ten minutes before the battery anxiety sets in, and it leaves one hand permanently occupied on a path where you may need both hands for balance. A proper head torch — inexpensive, packable, and covered in more detail in our guide to levada safety in the tunnels — is not a nice-to-have on this route. Bring a backup light or spare batteries too; islands with damp forest air are not kind to torch batteries left unused in a drawer for a year.
None of this makes the walk unsafe if you’re equipped and paying attention. It does mean this is a poor choice for a first levada walk, for anyone with real unease about tight, dark spaces, or for a group that includes someone who’ll insist on doing it in flip-flops with their phone flashlight. If any of that describes your trip, the shorter, tunnel-free Levada das 25 Fontes is the better introduction to what a levada walk actually is.
Permits and the €3-a-Day Rule
Since 1 August 2021, Madeira’s official PR trails — this one included — require a paid permit, booked in advance online and checked, at least occasionally, by rangers on the ground. It’s the detail most older blog posts and even some printed guidebooks still miss entirely, because it postdates them.
| Permit detail | Information |
|---|---|
| Cost | Around €3 per person, per trail, per day |
| Where to book | simplifica.madeira.gov.pt (official portal) |
| What to carry | The booking confirmation — a screenshot is generally accepted |
| In force since | 1 August 2021 |
| Coverage | This trail only; a separate booking is needed for each different PR trail you walk |
Book a day or two ahead where possible, especially in peak walking season — the system occasionally caps daily numbers on the busiest routes. Full detail on how the booking system works, and which trails it covers beyond this one, is in our dedicated guide to Madeira’s hiking permits and trail fees.
What to Pack for a Levada With Tunnels
Beyond the head torch already mentioned, treat this as a proper day hike rather than a stroll. Good grip matters more than waterproofing — trail shoes or boots with real tread will serve you better on the wet, sometimes mossy sections than a pair of trainers with smooth soles. Bring more water and food than you think you’ll need; there’s nowhere to buy either between Queimadas and the pool, and the walk regularly runs longer than planned.
Temperatures inside the tunnels drop noticeably compared with the forest outside, and the forest itself sits high enough that Madeira’s usual coastal warmth doesn’t apply — our guide to mountain weather and what to wear covers the layering this route needs in more detail. A lightweight waterproof is worth carrying even on a forecast-dry day; this is the wet, laurel-forest side of the island, and conditions change fast.
Caldeirão Verde Versus the Levada das 25 Fontes
Visitors doing one levada walk on their trip almost always narrow it to these two, and it’s worth being clear about how they differ before you commit a full day to either.
| Levada do Caldeirão Verde | Levada das 25 Fontes | |
|---|---|---|
| Starting point | Queimadas, above Santana | Rabaçal, reached by shuttle from the car park |
| Round trip distance | ~13km | Considerably shorter |
| Tunnels | Four, unlit | None |
| Difficulty | Longer and more demanding than it looks | Gentler, better first levada walk |
| Payoff | A pool and single cascade at Caldeirão Verde | A wide pool below several waterfalls |
If you’re choosing one, let the tunnels decide it: comfortable with a long day in the dark and drawn to something wilder-feeling, this route wins. Wanting the classic postcard levada experience without the torch and the extra kilometres, go for 25 Fontes instead. Plenty of visitors on a longer trip do both, on separate days, and neither feels repetitive alongside the other.
Making a Full Day of the Central Mountains
The Queimadas area sits within easy striking distance of several other highlights on this side of the island, which makes it easy to build the walk into a broader day in the mountain interior rather than an out-and-back errand. Santana and its triangular thatched houses are a short drive below the trailhead — a natural stop for lunch or a coffee before or after the walk. São Jorge on the coast and the high pass at Encumeada both make sense as detours if you’re basing yourself for a couple of days around the north.
Walkers who want to see more of the mountain interior without committing to a second 13km day sometimes pair a Caldeirão Verde morning with an afternoon drive up towards Pico Ruivo or the shorter walk at Ribeiro Frio, which shares the same laurel forest without the tunnels or the distance. For a different way to see this stretch of Madeira’s interior — jeep rather than boots — a Santana to Pico do Arieiro jeep tour covers similar ground from a vehicle, useful on a day when legs need a rest but the scenery doesn’t.
For visitors building their trip around the island’s high peaks rather than its levadas, the sunrise or sunset trips to Pico do Arieiro are the other side of this same mountain range. a sunset visit to Pico do Arieiro and the Stairway to Heaven and, further west, a guided PR13 walk through the twisted til trees at Fanal both sit within the same central mountain region covered by this page and pair naturally with a Caldeirão Verde day earlier or later in your trip.
When to Go
The best windows are April to June and September to October, when the north coast has usually had a break from the heaviest winter rain but before the trail dries out enough to lose its green cover entirely. Avoid going straight after a period of heavy rain regardless of season — beyond the discomfort, the sections above the levada’s drop become genuinely more hazardous when wet, and rockfall risk rises on the tunnelled stretches. Check the trail’s current status with the IFCN, Madeira’s forestry and nature institute, before you drive out; sections of this route do close, sometimes for weeks, after storms.
Early starts pay off twice over here: cooler temperatures for the first, uncovered stretch out of Queimadas, and a real chance of having the tunnels to yourself rather than queuing single-file with a tour group’s torches bobbing ahead of you.
Caldeirão Verde Hike: Your Questions Answered
How long is the Levada do Caldeirão Verde walk?
Around 13km there and back from the Queimadas car park, with almost no elevation gain along the way. Most walkers need five to seven hours including rest and photo stops, which is longer than the flat profile alone would suggest.
Do I need a permit for this trail?
Yes. Since 1 August 2021, this official PR trail has required a paid permit — roughly €3 per person, per day — booked online at simplifica.madeira.gov.pt and produced if checked on the ground.
Are the tunnels genuinely dark?
Completely. There are four of them, the longest running over 200 metres through solid rock with an uneven, often wet floor. A proper head torch, not a phone light, is the only sensible way through.
Is this hike suitable for beginners or families with young children?
Not really. The distance, the unlit tunnels, and the unguarded drop above the levada in places make it better suited to walkers with some hiking experience than to a first family outing on the island.
What’s the difference between this walk and the Levada das 25 Fontes?
Both are historic irrigation channels turned into signature walks, but the 25 Fontes route at Rabaçal is shorter, has no tunnels, and ends at a wide pool below several waterfalls, while Caldeirão Verde is longer, tunnelled, and ends at a single deep pool and cascade.
Can I swim in the pool at the end?
Some people do, but the water stays cold year-round, there’s no lifeguard or changing facility, and the surrounding forest rarely gets direct sun for long — treat it as a brief, bracing dip rather than a swimming stop.
What should I pack?
A head torch with spare batteries or a backup light, warm layers for the tunnels, grippy footwear, more food and water than feels necessary, and your permit confirmation saved somewhere you can show it without a signal.
Is the trail ever closed?
Yes. Heavy rain, rockfall risk, or scheduled maintenance close sections of this route without much notice, so checking the IFCN’s trail status before you drive out is worth the couple of minutes it takes.